A lovely redditor on /r/crochet posted a link requesting a translation for a pattern that she found on a Brazilian blog. Before we jump straight to the pattern, I want to take a moment to credit the original website and write some much needed notes based on the pattern itself.

Credits:
- Original Pattern Blog: Ponto Arroz Blog
- Creation: Lilian Kimura for Coats Corrente
- Crocheted by: Atelie Morena Jambo
- Model: Hana Oliveira
- Size: 38-40
Notes (please read):
- The designer does not tell you what to do, she only tells you how many times you need to work the "groups" of stitches in the diagram.
- The designer also doesn't tell us whether she is working in the round or if she's working in rows. I'm going to go with the row option since she has you join the work at the end using sc's.
- And lastly, the designer also left where you're supposed to increase in the pattern. I've bolded the rows that you need to increase, but it's up to you to decide where to place those increases.
You will need:
Instructions:
The piece is worked first by crocheting the back piece and stopping at the neckline. Before working on the sleeves and bottom detailing, the entire piece will look flat like a blanket until both sides are sc'd together. Here is a diagram explaining the sizes for the back/front pieces:
- 6 skeins of Camila Fashion yarn (500m) in white.
- 2.5mm Hook.
Instructions:
The piece is worked first by crocheting the back piece and stopping at the neckline. Before working on the sleeves and bottom detailing, the entire piece will look flat like a blanket until both sides are sc'd together. Here is a diagram explaining the sizes for the back/front pieces:

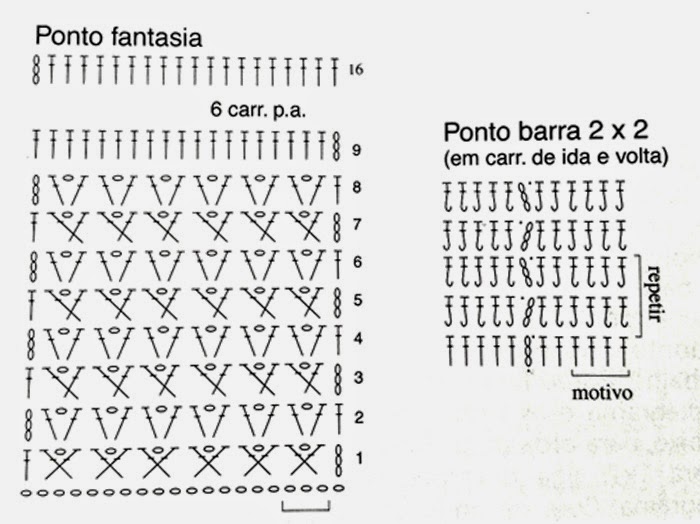
In the upcoming pattern, please refer to this image for the stitch groupings.
Back:
Row 1: Make 149 chains loosely and work in "ponto fantasia" (In the diagram, ponto fantasia is a row of dc's that end with a chain 3).
Row 3: chain 3, (dc, chain 1, dc) in the chain one space of the x-stitch. Repeat until the end of the row, dc.
Row 4 to 9: repeat row one and two.
Row 10 to 17: 146 dc.
Row 18: chain 3, 65 x-stitches, dc. INCREASE SOMEWHERE ON THIS ROW!
Row 19: chain 3, (dc, chain 1, dc) in the chain one space of the x-stitch. Repeat until the end of the row, dc.
Row 20 - 25: repeat row 17 and 18.
Row 26 - 33: 197 dc.
Row 34: chain 3, 71 x-stitches, dc. INCREASE SOMEWHERE ON THIS ROW!
Row 35: chain 3, (dc, chain 1, dc) in the chain one space of the x-stitch. Repeat until the end of the row, dc.
Row 36 - 41: repeat row 33 and 34.
Row 42 - 49: 215 dc.
Row 50: chain 3, 71 x-stitches, dc.
Row 51: chain 3, (dc, chain 1, dc) in the chain one space of the x-stitch. Repeat until the end of the row, dc.
Row 52 - 57: repeat row 33 and 34.
Row 58 - 65: 215 dc.
Front:
Work the same way as the back until you reach the neckline.
Assembling and finishing:
Close the shoulders (figure a) and the diagonal increases (figure b) with sc worked on the wrong sides, grabbing a stitch from each piece. So to clarify, work on the reverse sides of the pieces so the stitches will be invisible on the right side of the work. Leave a gap for the neckline, sleeves and bottom torso area.
Following the assembling, work the "barra" on the bottom of the piece (the thinest part). Distribute 284 dc around the entire piece (this is the barra). From here, you will work the "ponto barra", which according to the diagram, it goes as such:
PONTO BARRA:
Row 1: Dc until you reach the end of the round (I suggest you use a stitch marker for this), turn your work.
Row 2: Chain 3, bpdc, bpdc, fpdc, fpdc, bpdc, bpdc... repeat until the end.
Row 3: Chain 3, if the stitch you're starting with is bpdc, work in fpdc and do the opposite of the stitch below until the end. So if the bottom stitch is fpdc, work a bpdc. If it's bpdc, work a fpdc.
Work 23 rows of ponto barra.
Sleeves:
Distribute 112 dc equally around the entire sleeve. Work ponto barra again.
Work 26 rows of ponto barra.
To finish off the sleeves and the bottom, work a row of dc.
Congratulations, you're done! Please keep in mind that both the blogger and the designer were extremely vague about the pattern, so I cannot guarantee a perfect translation. I personally have not tried this pattern yet, but if anyone has any questions, please feel free to ask!
Have a wonderful weekend!
- Nat
Row 1: Make 149 chains loosely and work in "ponto fantasia" (In the diagram, ponto fantasia is a row of dc's that end with a chain 3).
- In the first group of every motif change, distribute the stitch and motifs equally and then accompany with the 7 groups after. THIS MEANS YOU HAVE TO FIGURE OUT THE INCREASES YOURSELF IN THE FIRST ROW OF EVERY GROUPING. I have labelled this part below!
Row 3: chain 3, (dc, chain 1, dc) in the chain one space of the x-stitch. Repeat until the end of the row, dc.
Row 4 to 9: repeat row one and two.
Row 10 to 17: 146 dc.
Row 18: chain 3, 65 x-stitches, dc. INCREASE SOMEWHERE ON THIS ROW!
Row 19: chain 3, (dc, chain 1, dc) in the chain one space of the x-stitch. Repeat until the end of the row, dc.
Row 20 - 25: repeat row 17 and 18.
Row 26 - 33: 197 dc.
Row 34: chain 3, 71 x-stitches, dc. INCREASE SOMEWHERE ON THIS ROW!
Row 35: chain 3, (dc, chain 1, dc) in the chain one space of the x-stitch. Repeat until the end of the row, dc.
Row 36 - 41: repeat row 33 and 34.
Row 42 - 49: 215 dc.
Row 50: chain 3, 71 x-stitches, dc.
Row 51: chain 3, (dc, chain 1, dc) in the chain one space of the x-stitch. Repeat until the end of the row, dc.
Row 52 - 57: repeat row 33 and 34.
Row 58 - 65: 215 dc.
Front:
Work the same way as the back until you reach the neckline.
Assembling and finishing:
Close the shoulders (figure a) and the diagonal increases (figure b) with sc worked on the wrong sides, grabbing a stitch from each piece. So to clarify, work on the reverse sides of the pieces so the stitches will be invisible on the right side of the work. Leave a gap for the neckline, sleeves and bottom torso area.
Following the assembling, work the "barra" on the bottom of the piece (the thinest part). Distribute 284 dc around the entire piece (this is the barra). From here, you will work the "ponto barra", which according to the diagram, it goes as such:
PONTO BARRA:
Row 1: Dc until you reach the end of the round (I suggest you use a stitch marker for this), turn your work.
Row 2: Chain 3, bpdc, bpdc, fpdc, fpdc, bpdc, bpdc... repeat until the end.
Row 3: Chain 3, if the stitch you're starting with is bpdc, work in fpdc and do the opposite of the stitch below until the end. So if the bottom stitch is fpdc, work a bpdc. If it's bpdc, work a fpdc.
Work 23 rows of ponto barra.
Sleeves:
Distribute 112 dc equally around the entire sleeve. Work ponto barra again.
Work 26 rows of ponto barra.
To finish off the sleeves and the bottom, work a row of dc.
Congratulations, you're done! Please keep in mind that both the blogger and the designer were extremely vague about the pattern, so I cannot guarantee a perfect translation. I personally have not tried this pattern yet, but if anyone has any questions, please feel free to ask!
Have a wonderful weekend!
- Nat


 RSS Feed